We’ve all seen how easy it is to set up and operate out in the field using the low cost quick deploy portable antenna and using battery power and portable radios. But that only gets you SSB and CW. What if the bands aren’t great and you want to work FT-8? You’ll need a PC, but more importantly, you’ll need a PC with accurate time!
FT-8 works on synchronized transmission cycles – some stations transmit in the first 13 seconds (of the minute) and another set replies from seconds 15-28. Then the cycle repeats. One of the benefits of the mode is the knowledge of when stations will be transmitting. All this requires an accurate clock (and given that the WSJT-X software runs on the computer), that means that the computer clock must be accurate. Just how accurate, you ask? According to the mode specs, you need to be within =/- 500 milliseconds of standard time (1/2 second). Sometimes that can be tough to achieve with a computer that hasn’t been connected to the internet recently. GPS to the rescue!
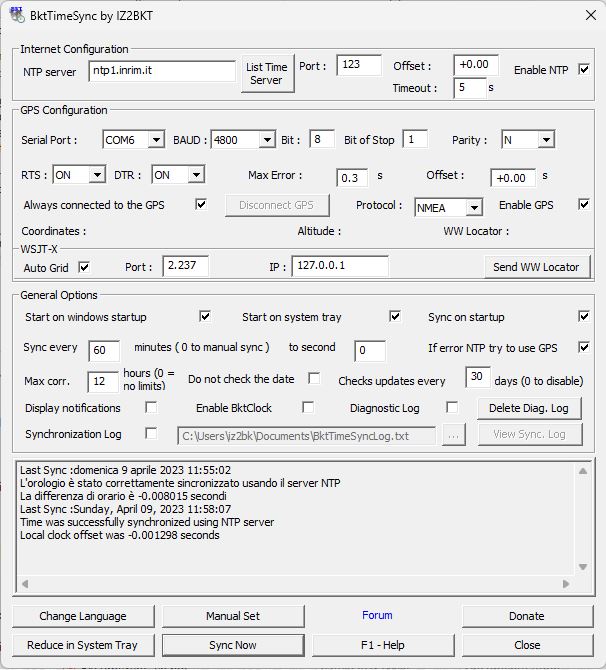
There are several inexpensive GPS devices that have USB ports. With the proper software, these devices can be used not only to accurately detect your position, but to set your computer’s clock (much more accurately than is needed for FT-8). The picture above shows such a device that I’ve used to set a laptop clock within just a few seconds. There are several sync programs available but the one that I used is BktTimeSync (shown below). It’s free and available here: https://www.maniaradio.it/en/bkttimesync.html
BktTimeSync User Interface
Just install the software and connect the GPS “dongle”. The driver for the GPS should install automatically, after which the GPS device will show up as a “COMx” port (you can open Device Manager if you don’t know which port number). Once you select the correct COM port in the software and select “connect”, the clock should update in less than a minute (check the status messages in the software). Now you’re ready for portable FT-8!
What if I told you that there was once a big wall-mounted device (called a GeoChron) that cost hundreds, even thousands, of dollars, and that many hams coveted it as the ultimate shack accessory. And what if I told you that said GeoChron gave you an up-to-date DX map of the world and showed light/dark areas, sun position, and grey line, and was the first thing a non-ham noticed when walking into a ham’s shack for the first time, getting “oohs and aahs”. Now, what if I told you that, instead of having to buy a big expensive gadget, all that capability and much much more is now available in a single piece of software, and that software is FREE and runs on a Raspberry Pi. So now for $15 (Raspberry Pi Zero) and a bring-your-own HDTV or computer monitor, you can have the ultimate shack accessory!
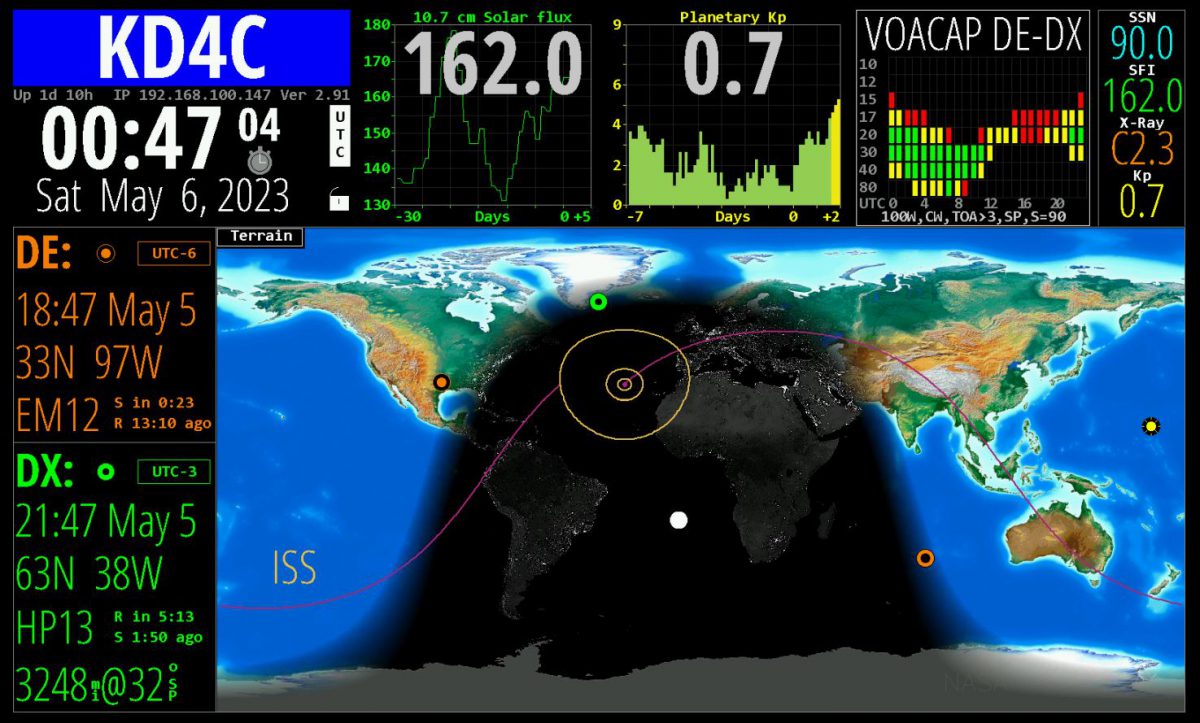
This software is packed with so many helpful features that I’m going to have a hard time describing them all here. First, in addition to a Local or UTC clock, it’s a real-time Map of the World, that shows sunlight position and illumination, and the current position of the “grey line”. Second, it displays information about your selected “DX” station, including position, grid square, short path and long path range and rotor bearing, current weather, and time. Third, it has helpful “widgets” for propagation (SFI, Sunspots, Planetary K, DRAP, Sun imaging – pretty much any propagation related statistic. Fourth, it can monitor and display live spots from the DX cluster and POTA and your spots from PSK Reporter. Fifth, it has built-in orbital predictions to show when your favorite ham satellites are going to be overhead. Plus, you can view and control the entire display in a web browser on your network (if you have the big image on a wall HDTV). Oh and did I mention that the software has a full API so you can control it from other software (more on this later)? Now I’m exhausted from trying to describe the features, and I’m sure I missed some.
A recent HamClock image from my shack. Just look at all the features crammed into this little (and free) marvel!
Now surely by now you’re asking “how can I get such a thing?” Well, the hardest part is getting your hands on a Raspberry Pi. A Raspberry Pi Zero will work just fine, and they have been available every other week at MicroCenter – You will have to be diligent and check the website. You will also need a MicroSD card (also available at MicroCenter). The process is fairly simple, even if you’ve never done much with a Raspberry Pi: 1) Install Raspberry Pi OS (there are a bunch of YouTubes on how to do this), and 2) go to the HamClock page, select the “Desktop” tab, and follow the easy instructions. The User Guide is fully documented so you can figure out all the things that you can configure and click on!
Because this is Linux, I will warn you now that it’s not the usual Microsoft “double click the installer” app – there are some “command line” instructions (I think a total of 4). Do not let this scare you off! The result is worth it to have this on your shack wall. I recommend that you just run it “full screen” and just use the built-in HDMI out of the Pi (you might need an adapter) and just pump the display into a wall-mounted HDTV or a spare computer monitor with an HDMI input. But you can also just stick the Pi under the desk and run it in a browser window, through a VNC session, or on a small dedicated display.
Oh, and I mentioned a fully scriptable interface. After a small mention and prompting from me, Josh N4NZ created a small NodeRed flow to take the “double-click” station from WSJT-X, harvest the Grid Square, and send it to HamClock. So now when you click on a station calling CQ on FT-8, the HamClock map will then set the DX on the display and you will see the path, range and bearing, etc. That’s both cool and helpful. This part is a little more involved than the basic install, but if you understood the previous sentences in this paragraph, talk to one of us after you get HamClock up and running!Jason KM4ACK shows how to install and configure HamClock (as well as some extra things list change the display resolution)
Those who know me and my ham radio experience know that I love 10 Meters. Early in my ham career (and in the peak days of solar cycle 21), I would come home from school and turn on the radio to armchair copy of VK/ZL and South American stations on 10M SSB, just like they were next door. In between those booming signals, there was silence! No noise, no static, no foreign broadcast QRM, and (because this was before the ubiquity of computers and cell phones) no computer interference. So you would tune from S9 station to S9 station with almost nothing in between!
Then at nighttime (after the band had closed – although sometimes it didn’t), there was a local bunch that gathered on 28.650 MHz. Almost every evening, there would be 15-20 of us from all walks of life – a high school kid like me, young tech types like my friend KD4B that worked for IBM (we passed Extra on the same day), housewives, some “old” men in their 40s, and one very feisty grandmother – and we would just have this perpetual roundtable, talking about nothing and everything, until we got tired. And then we would do it all again the next night. All of us were within 10-15 miles “ground wave” of each other. Signals weren’t strong, but the noise was low enough that it didn’t matter. It was a very formative experience to me (a lowly high school kid) being accepted into that group as a peer, and it was the start to a lifetime of ham radio experiences on 10 Meters.
Fast forward to today. The start of a new solar cycle – probably not as good as cycle 21, but promising to be fun nonetheless! 10 meters is starting to cook on many days, and I needed a good antenna to take advantage of it!
My go-to antenna for the high bands has been a Hy-Gain 12-AVT trap vertical mounted on my roof. While the antenna has worked and served me well, it’s just a poor compromise on 10 meters. First of all, due to the trap layout, only the bottom 6 feet are active on 10 meters (the rest of the antenna having been “cut off” by the 10M trap). Second, with only (less than) a quarter wavelength active, the radiation angle is higher than what I wanted. Third, the antenna (as do most 1/4 wave direct-fed verticals) picks up a lot of static. I live in the shadow of a sometimes-noisy 62KV feeder line. I needed something better if I was to catch 10 meters at the peak of cycle 25.
Someone put an idea in my head to look at classic CB antennas (I think I’ll blame Callum M0MCX). Say what you will, but in the ’70s there were some hardcore CB’ers looking to squeeze every bit of radiation out of their whopping 4 watts of ERP. Who am I kidding, they were all running 50w bricks. Anyway, I digress. They did have some pretty good antennas, and some of these designs have stood the test of time.
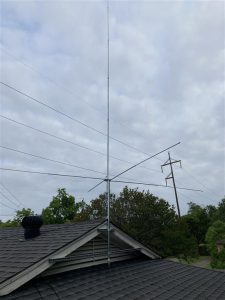
The Hy-Gain SPT-500 mounted to my roof. 22 feet of 10 Meter Band goodness.
I looked at several currently-offered 10-11-12M antennas, some of which are European (remember, 11 meters is a ham band in some Region 1 countries) and ran across references to the “Super Penetrator” by Hy-Gain. Thousands were sold in the ’70s. Hy-Gain has now been assimilated into the MFJ world, but the antenna has been re-issued as the Hy-Gain SPT-500. Ham Radio Outlet had one in stock in Plano (so no shipping!), so I gambled and bought one.
It was easy enough to assemble and tune, so I won’t spend any time on that. Now, to the things that I really like about this antenna:
Height – The radiator is 22 feet tall. I think it’s technically a 5/8 wave – that’s 22 feet of radiator! Sure beats the poor 6 feet of 12-AVT metal before getting cut off by the 10m trap!
Low Radiation Angle – Because this is much longer than a standard 1/4 wavelength radiator, the DX radiation angle is much lower.
Broadband – It’s extremely broadband and less than 2:1 across the entire 10m band. Plus, it can be tuned for 12m and 6m using the internal tuner.
Built-In Ground Radials – There are 4 horizontal full quarter-wave (108″) ground elements, so I don’t have to worry about having a suitable surface underneath it or worry about stringing ground elements.
DC-Ground – The antenna is fed with a unique “hairpin” feed (no matching coil!) that is electrically grounded. This means that the antenna is extremely low static noise. I can confirm this on my FT-DX10 waterfall just by switching back and forth between this and the 12-AVT. Noticeable difference in the band noise.
Easy To Mount – I just put it on a 5.5 foot fence post mast mounted to some unistrut on my eave, up about 20 feet.
Using this antenna has been a pleasure so far. Pretty much, if I can hear it I can work it. I consistently get FT-8 signal reports that are 2-10 units higher than what I send (if I see the other station at -10, it’s not uncommon for them to send me a -2 or higher). The low-noise aspect helps out also as I see stations at -20 and below.
The down side to this antenna is dedicating so much roof real estate to a single band vertical. But it will all be worth it if I can get some of the magic back like I had in Cycle 21. Anyone want to start a 10 Meter roundtable at night?
[This piece also posted to the Richardson Wireless Klub (RWK) Chawed Rag August 2022 newsletter]
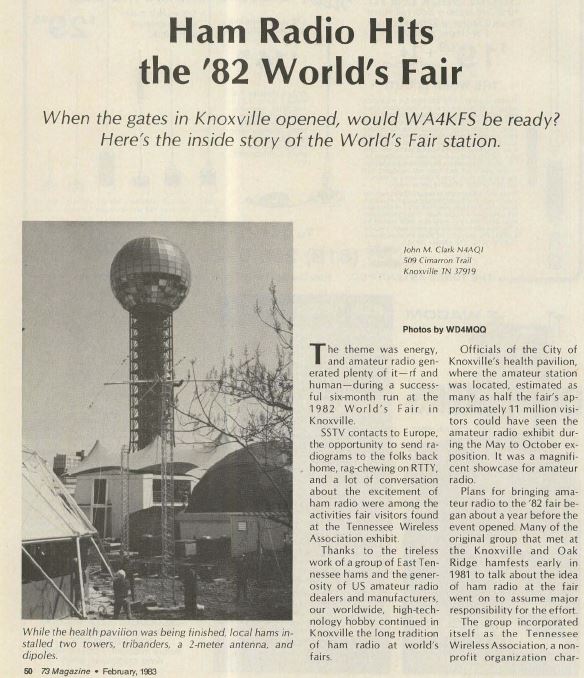
In 1982, a World’s Fair was held in Knoxville Tennessee, my hometown. Dubbed the “Energy Exposition”, there was a full six months of activities and displays from the United States and over 25 countries, and over 11 million visitors over the Fair’s run. I was fortunate to be a part of the planning and execution of a major exhibit to include Ham Radio as part of the 1982 World’s Fair.
The following article was published in the February 1983 issue of 73 Magazine describing the ham radio exhibit and how it all came together.
Ham Radio Hits the ’82 World’s Fair
When the gates in Knoxville opened, would WA4KFS be ready? Here ‘s the inside story of the World’s Fair station.
By John M Clark, N4AQI (photos by WD4MQQ)
While the health pavilion was being finished, local hams installed two towers, tribanders, a 2 meter antenna and dipoles.
The theme was energy, and amateur radio generated plenty of it – rf and human -during a successful six-month run at the 1982 World ‘s Fair in Knoxville.
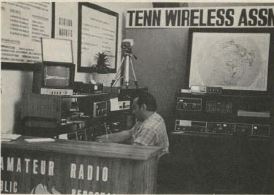
SSTV contacts to Europe, the opportunity to send radiograms to the folks back home, rag-chewing on RTTY, and a lot of conversation about the excitement of ham radio were among the activities fair visitors found at the Tennessee Wireless Association exhibit.
Thanks to the tireless work of a group of East Tennessee hams and the generosity of US amateur radio dealers and manufacturers, our worldwide, high -technology hobby continued in Knoxville the long tradition of ham radio at world’s fairs.
Officials of the City of Knoxville’s health pavilion, where the amateur station was located, estimated as many as half the fair’s approximately 11 million visitors could have seen the amateur radio exhibit during the May to October exposition. It was a magnificent showcase for amateur radio.
Plans for bringing amateur radio to the ’82 fair began about a year before the event opened. Many of the original group that met at the Knoxville and Oak Ridge hamfests early in 1981 to talk about the idea of ham radio at the fair went on to assume major responsibility for the effort.
The group incorporated itself as the Tennessee Wireless Association, a nonprofit organization chartered for the sole purpose of sponsoring an amateur radio exhibit at the fair. Under TWA president Ed Dunn W4NZW, the group’s first order of business was to approach fair officials about obtaining a site for the station. Virgil Davis KA4RPA, a TWA officer, talked with Knoxville mayor Randy Tyree and secured a location in the city’s health pavilion. Health care under emergency conditions was the theme of several exhibits in the pavilion, and the mayor and city officials felt the station would be appropriate there because of the emergency-communications aspect of the amateur service.
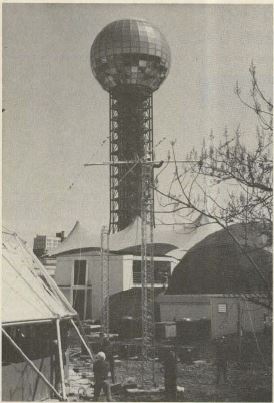
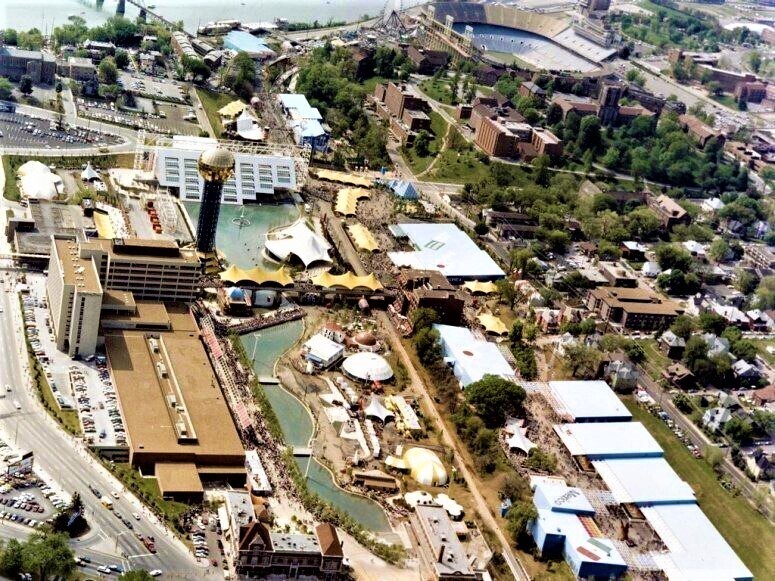
The site was superb. The health pavilion was a striking geodesic dome in the center of the fair site, near the Sunsphere, the fair’s theme structure. An additional benefit was being located in a high-traffic area near the pavilion’s entrance.
Operators from throughout the US and many foreign countries stopped by to operate the station. A commemorative certificate and QSLs were available from the Tennessee Wireless Association.
With the exhibit space tied down, TWA officers turned their attention to lining up equipment which would demonstrate the diversity of amateur radio. Ten-Tec Inc., located in nearby Sevierville, was asked to supply HF rigs for three stations. The company agreed, and Tom Salvetti WD4FVU of Ten-Tec accepted the job as equipment coordinator for TWA.
Amateur dealers and manufacturers responded generously to Salvetti’s calls, and approximately $20,000 worth of state-of-the-art gear was loaned and soon on its way to Knoxville.
L. B. Cebik W4RNL, who has written a book on station design, was called on to produce a layout making the most efficient use possible of the 105-square-foot space. Three stations, two designated for general operating and one for specialized communications, were planned.
Although equipment needs were largely met by dealers and manufacturers, funds for installation and operation of the station were needed. Eleven area radio clubs and more than 60 individual amateurs responded, and Jerry Goodchild K4DZR, TWA secretary/treasurer, reported that approximately $2000 was donated to support the station.
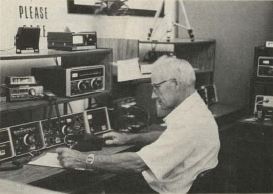
Jerry also accepted, with the help of station trustee Chip Coker KD4C, the job of scheduling control operators for the station. About 40 hams each month worked shifts of three to eight hours as control operators. The station was staffed almost all of the 12 hours per day the six-month fair was open.
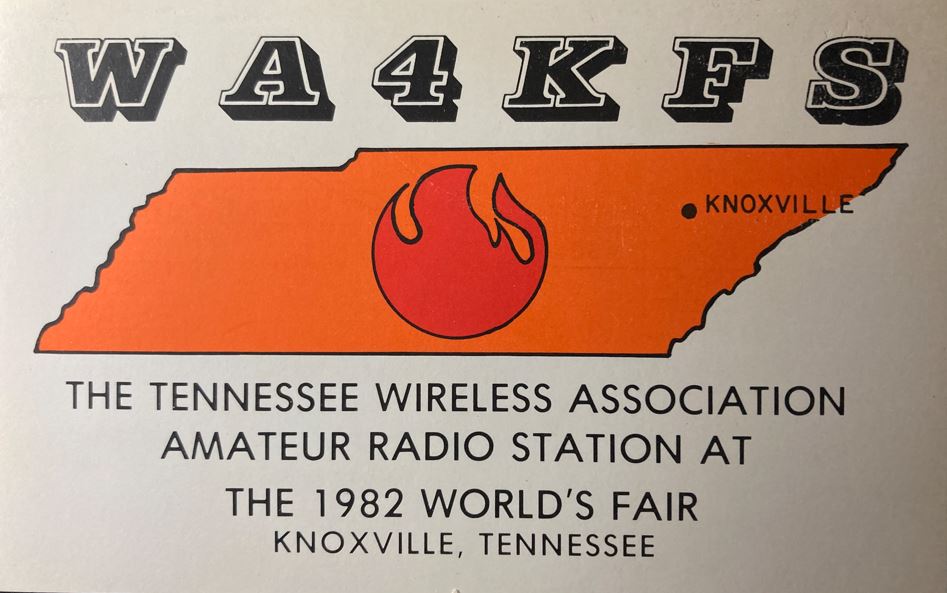
TWA directors talked about asking the FCC for a special call sign for the station, hoping that Knoxville’s hosting the first world ‘s fair in the South would persuade the commission to relax regulations on special calls. Deciding that prospect was dim, Chip KD4C offered the use of WA4KFS, for which he is trustee. Perfect – the phonetics would be “Knoxville Fair Station.”
George Child N4BCS installed the 2 meter antenna atop one of the two crank-up towers in the shadow of the Sunsphere.
A year-long planning effort by TWA paid big dividends when the time came to install the station. Construction at the fair site was on a tight schedule, with several buildings being ready only hours before the May 1st opening. While work continued on the health pavilion, TWA erected its two 50-foot towers and rotors from Hy-Gain/Telex and Texas Towers. Aboard were a Hy-Gain TH-3 and a V-2 for 2 meters and a KLM KT34A, Dipoles for 40 and 80 meters were cut , and feedlines from Times Wire and Cable Company were strung and ready to be hooked to the rigs. The three stations were built around Ten-Tec Omni C transceivers and Hercules solid-state linear amplifiers. Matching tuners, vfo’s, keys, and mikes were from Ten-Tec, with MFJ providing memory keyers and clocks. KDK Distributing of Nashville supplied KDK 2036 transceivers for 2 meters. All the gear was housed in stylish consoles from S-F Amateur Radio Services of California.
The latest RTTY equipment was sent to Knoxville by Hal Communications, and SSTV gear came from Robot Research. Both slowscan and Teletvpe attracted a lot of attention from non-hams who stopped by the exhibit.
RCA and Smith-Victor Sales supplied the SSTV camera, monitor, and tripod, and Overman International, which has a manufacturing plant in Knoxville, provided chairs for the station, which was fully accessible to handicapped operators.
A crowd of 82,000, including President and Mrs. Ronald Reagan, enjoyed opening day ceremonies on May 1st. Shortly after the official festivities, WA4KFS went on the air. Pileups were common, as hams around the world wanted an ’82 World’s Fair QSL card or a special certificate for working the station and 10 other Tennessee hams from May to October.
Amateurs coming to Knoxville were provided with World’s Fair information via ham radio. A 2-meter information station was built and placed on the air by Robin Rumbolt WA4TEM. By keying the station on simplex and giving their call, hams received information on parking, shuttle bus service, and lodging. Area repeaters were monitored by operators who could give directions and answer questions about East Tennessee and the fair.
Many amateurs heard of WA4KFS from the 2-meter information station, but a large number said they knew about the exhibit before coming to Knoxville, thanks to the work of publicity director Steve Kercel AA4AK. Some hams spotted the tri-banders and followed the coax into the pavilion. All visiting amateurs were asked to sign the guest log at the reception counter and were given the opportunity to operate the station.
Three complete HF stations with SSTV and RTTY made up the amateur radio exhibit at the Knoxville World’s Fair. Information on amateur radio for non-hams was available at WA4KFS.
And operate they did – all modes, all bands. Some kept skeds they’d made in advance, others checked into nets, some looked for DX. Many added considerable skill to the art of ragchewing.
Control operators answered thousands of questions from non-ham fair visitors and helped hundreds fill out radiograms, which were moved by Anita Teffeteller NG4J, one of the nation’s top traffic handlers. Brochures about the station with tips on how to become a ham were given to those who stopped by for a chat.
Several control operators said they found conversations with fair visitors American as well as foreign interesting and educational. The foreigners came from Australia, South America, New Zealand, South Africa, Europe, and many other parts of the world.
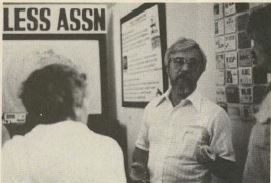
With QSLs in the background, Charlie Price WB4VFP explained the ma y facets of amateur radio to the public.
If you worked the World’s Fair station and want a QSL, send an SASE to Harvey Cross W4PKM. You can get the special certificate for working WA4KFS and 10 other Tennessee stations by sending $2 and log confirmation to Sarah Hickey N4EFA.
TWA, the 1982 World’s Fair, and the amateur community express their gratitude to the manufacturers and distributors who made the “Knoxville Fair Station” possible. Those firms were: Hal Communications, HyGain/Telex, KDK Distributing, KLM Electronics, MFJ, Overman International, RCA, Robot Research, S-F Amateur Radio Services, Smith-Victor Sales Corp ., Ten-Tec. Inc., Texas Towers, and Times Wire and Cable Co.
Thousands of people at the fair saw amateur radio at its finest, and East Tennessee hams who served as control operators and repeater monitors threw in a large dose of southern hospitality for good measure, look for some new hams on the airwaves because amateur radio went to the fair.
The Official QSL Card from the 1982 World’s Fair Amateur Radio Station
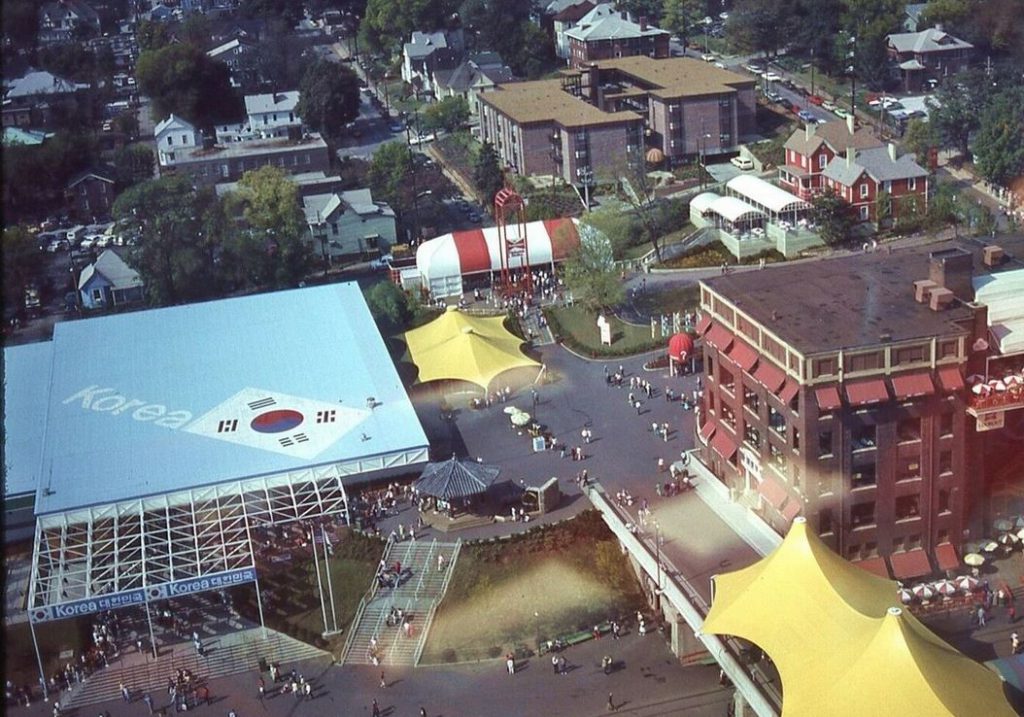
Here are a few pictures that show the 1982 World’s Fair site and the location of the WA4KFS 1982 World’s Fair “Knoxville Fair Station”
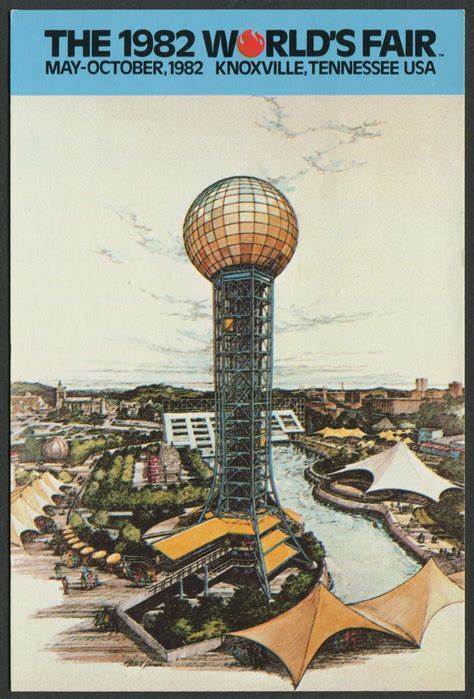
Just behind the International Court of Flags, the geodesic dome was home to the Knoxville Health Pavilion, which contained the WA4KFS “Knoxville Fair Station”. If you look at the center of the photo you can see one of the crank-up towers and HF yagi between the flags. Read on for an interesting story about the brick building in the background.Aerial view of the 1982 World’s Fair site. The Knoxville Health Pavilion Geodesic Dome (home to WA4KFS) is in the center of the photo. The Tennessee River and the University of Tennessee Campus and Football Stadium are in the background.One day not long after the opening of the 1982 World’s Fair, I got a call from the operators of the lounge in the top floor of the building adjacent to the WA4KFS World’s Fair Station (the balcony with the umbrellas at the right of the picture – you can see how close it was to the station in the pictures just above). Turns out, our radios were interfering with the lounge’s sound system! So I ended up installing a bunch of bypass capacitors on the microphone inputs to their mixer. Problem solved!Art image of the 1982 World’s Fair highlighting the Sunsphere theme building. Unfortunately, there was no way to get an antenna on the Sunsphere (although we talked about it!)A countdown sign on the site to the opening of the Fair. As the 73 Magazine article tells, there was a lot of effort by a bunch of hams to bring Ham Radio to the 1982 World’s Fair. I was just a college kid at the time and privileged to work alongside the founders of Ten-Tec and notable hams such a L.B. Cebik W4RNL.
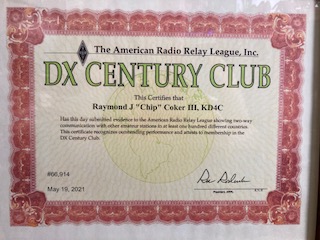
DXCC Award for KD4C – Confirmed contacts with 100 Countries
I didn’t make my original goal of DXCC by the end of 2020. Lots of reasons, none of which are important now. But another 5 months and it’s done.
Honestly, it’s a pretty big feat at solar minimum and wouldn’t have been possible without FT4/8 modes (which represent ~90% of my contacts). Also, it would have been much harder without LOTW, as all my 100 contacts were confirmed via LOTW. I suppose I could have waited another who knows how many months for paper QSL cards, but for this I was impatient. I actually had to work 108 countries to get 100 stations that were on LOTW, so I guess I’m on my way to the honor roll – it’s doubtful that I will get there but who knows. My only regret is that I’m sure that in the ’80s I worked at least 3-4 countries that no longer exist (East Germany, Yugoslavia, etc.) and I’d love to have those cards back.
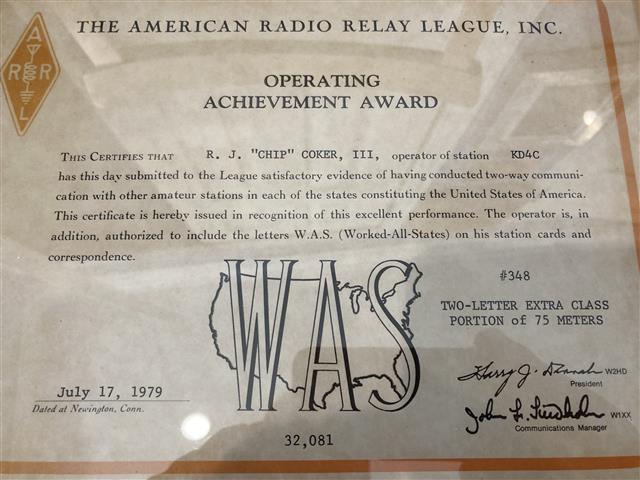
Back in the early days of my ham experience, just after I successfully upgraded to Extra in the fall of 1978, I was taking advantage of my new Extra class phone band privileges on 75M and happened across an interesting group of people that referred to themselves as the Geratol Net (notice the distinct spelling that differentiates from the legendary consumer dietary supplement, although I’m sure there was some overlap given the demographics of the people on the net).
The purpose of the Geratol Net was to aid members in obtaining an elusive endorsement that at one time was provided by the awards department of the ARRL – “Worked All States with Two-Letter callsigns in the Extra Class portion of 75 Meters” – Otherwise known as the Geratol Award, or as they call it, the “Unbelievable Operating Achievement Award“.
Being young and otherwise nocturnal, I had no problem dedicating lots of weekend hours late at night on the Geratol Net trying to obtain this elusive award. As you may or may not know, WAS on 75M phone is not an easy task, given the particulars of propagation. Couple that with finding stations in all those states that have 1×2 or 2×1 callsigns that are crazy dedicated enough to stay up half the hours of the evening pursuing the prize (or enabling those that desire it!). But such was my pursuit.
The net is structured in such a way as you can request certain needed states (I think it was up to 3 a night) and if stations in those states are present in the net, you will be given a (relatively) clear frequency to attempt to call them. If you’re both successful in giving and receiving reports (as refereed by the NCS) then a QSO is declared and QSL cards eventually pass in the night to arrive at the doors of both happy operators. Most nights there would be anywhere from 15-25 stations, so you might end up lucky or (more often than not) just there to help other stations out, since no one from your need list was checked in.
Since I was in Tennessee, I was sought after early on, mostly by western stations, but after awhile of me being a regular, Tennessee was no longer that needed. Working the close-in stations on 75M phone was relatively easy, even for a modest station running barefoot, but stations in the Northeast and Northwest were a bit elusive given 75M propagation and the distances involved. Most everyone on the net was concerned about Alaska and Hawaii and, while they were tough, I don’t remember them as being the most elusive. I expect the Alaska and Hawaii stations that were on the net had a) a bit better antenna system, and b) saintly patience, which was to our benefit.
Speaking of better antennas, I do remember the quest for a better 75M antenna as taking up quite a bit of time. Different orientations of dipoles, along with ground-mounted verticals all were in the mix to be tried if there was a needed station that was deep in the noise. But I never exceeded the barefoot power level of my modest Kenwood TS-520S.
As I recall, it took just under a year to find the 50 elusive stations, receive the needed QSL cards (through the snail mail!), verify everything, pack it all up and send it to Newington with the award application. Then to wait for the soon-to-be-cherished wallpaper to arrive…
My cherished WAS with the numbered Geratol Endorsement – #348
Arrive it did, and I was never so happy to put it in one of those cheap document frames and on the wall, staring at the cherished endorsement and knowing that I was #348 of a very select group.
Fast forward oh so many years, the vast majority of which I had no 75M phone capability, so therefore unaware of the fate of the Geratol Net, when I received an email requesting that I try to check in soon. Wait, it was still going after all these years? After the shift in 75M extra bandplan where the hallowed 3.787MHz was no longer an Extra-only allocation? Quick – to this new thing called the internet! A little searching and I found that the Geratol Net has a home on the internet, and that someone has obtained the numbered list of awards from ARRL. The awards department no longer issues the endorsement on a paper WAS certificate, so it’s no longer a League matter, but these guys have kept up the tradition and are issuing their own award. The site also had some notices that some of the notable calls from when I was hunting have gone SK, but the Geratol Net lives on. I hope to be a part of it again, just after I can start wrestling with a suitable 75M antenna!
I was close to DXCC in 1982. Back in the days of paper logs, QSL Cards, the DX “Buro” (QSL Bureau), and Cycle 21, it was fairly easy for a high school kid to work lots of countries on 15 and 10 meters. Having a 3 element beam at 55′ didn’t hurt either. But that was then. After being mostly inactive on HF for 20 years, moving 3 times, and leaving behind my log and QSL Cards, there’s no way to get back to where I was on the quest for DXCC.
So I’m starting over.
Now we have FT-8 and LOTW, so it’s a lot easier to make (and confirm) those weak signal contacts. In a little over 18 months, I’m up to 70 countries. Probably 15 or so behind where I was back then. Of course there’s no real way to know if I had something then that is now unobtainable (pretty sure I had East Germany and Yugoslavia confirmed), but I’m resigned to never being on top of the honor roll. I’d just like to have the milestone checked and maybe the wallpaper…
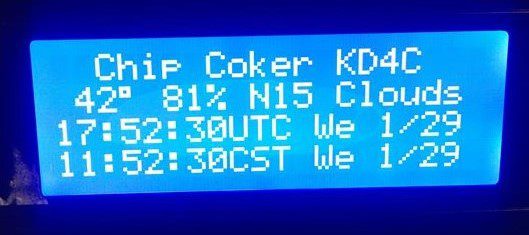
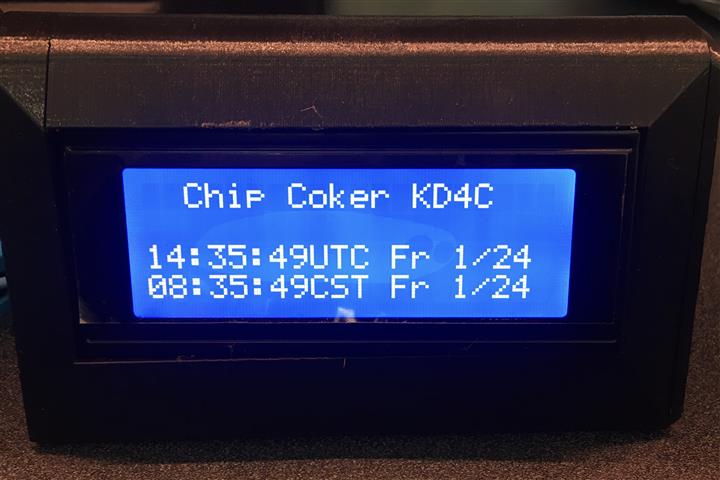
In my copious free time, I’ve been working on what to do with my empty Line 2 from clock ver 4.2. I went looking for online weather information that I could scrape and display, and there are a few different sources. I picked one (the price was right) but they are all fairly similar so this should be adaptable to the others if you want to play around.
Here’s what my display looks like now:
As with V4.2, the time updates once per day with the online NTP pool. The weather info is refreshed and displayed every 10 minutes (user changeable, but the free service is limited in the number of inquiries per day.
Here’s what you have to do to sign up for the free weather info:
After that, it should display your personal API key (a 32 character string) – save this key, you will need it.
Once you open up the V4.3 code (attached), there will be a place in the customization header to paste the key.
Don’t give out your API key – if your key exceeds the free lookup limit, they will shut off your access.
There’s one other library that is needed in 4.3 to parse the JSON data from the weather API:
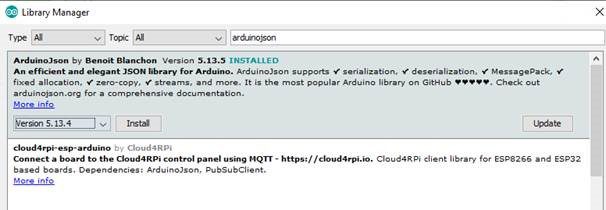
Inside the IDE, select “Tools -> Manage Libraries”
In the search box, type “ArduinoJson” ** Make sure you select the Highest Version 5 (5.13.5) in the pick list, then Install. If you mistakenly select Version 6.X.X, your sketch won’t compile!)
There’s a customization for weather location as well. It’s set to Richardson, but if you want to change it, openweathermap.org has a download of thousands of city ID codes that you can substitute in (I’ve put the code for plano in a comment line for those of you up north). If you don’t want to download the list, ask me and I’ll find your city code if it’s available.
If you look at the raw JSON data, there’s lots of other information that could be extracted and displayed if you want to rearrange the display and dive into the JSON parsing logic. There’s also a separate forecast string available.
Other than the weather inclusion, I’ve done some work for power management. This version shuts off the WiFi connection when not in use and adds a couple of other delay tweaks and uses about 65% of the current of Version 4.2. Mine draws around 80mA now. There may be some more tweaks to the backlight to cut the draw down further in the future.
That’s it for now, until I get my RTC chip in from China and can play with keeping the clock going through power outages.
Give it a try and let me know if you have questions.
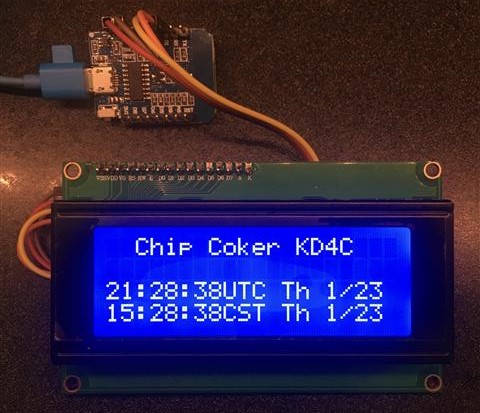
Recently, several of us in the Richardson Wireless Klub completed a small project session led by Brady Pamplin W5LH and Mike Jahrig KG5P to create a very inexpensive Wi-Fi-connected clock based on easy-to-use (and to learn) Arduino microcontroller and a multiline LCD display (see Figure 1). For someone that has had no experience with these types of components, I was intrigued and wanted to learn what these types of components are good for and how easy or hard it would be. I was very pleasantly surprised!
Arduino-based Wi-Fi-connected Ham Clock Project
What’s an Arduino?
The Arduino is a small single-board microcontroller
(processor and basic interfaces). There
are several versions but all are easy to use and have become very popular with
hobbyists and in educational uses. The project started in Italy (“Arduino” was
the name of the bar where the team met) to create low-cost and easy-to-use devices
that can easily interact with the environment using sensors and actuators. A very large number of types of devices are
now available and are being used in a huge number of very creative ways. You can find several types of devices in the
hobbyist section at places like MicroCenter, but your best bet is obtaining
parts on eBay directly from China, where they are much cheaper but take awhile
to arrive.
The basic parts that we used for the clock were a WeMos D1 Mini (around $3.50) and a 4 row x 20 character LCD display (around $7). Brady even whipped up some 3D printed cases. The microcontroller is powered by a micro-USB port (think phone charger) and in addition to the built-in input/output interfaces, has built-in Wi-Fi, so it’s very easy to build things without having to figure out the basics.
For our clock, the hook-up is literally 4 wires between the
two components: Power (5VDC) from the controller board to the LCD display, and
a serial interface (data/clock) to the display’s interface module. Even if you didn’t want to dive into how all
this works, you could easily build one.
But you would be missing most of the fun.
It’s important to note the difference between the Arduino and a Raspberry Pi. Although easy to confuse, they are actually quite different. The Pi is a very small computer – it has an operating system, common human interfaces like a keyboard and display, and it can do lots of things at the same time. The Arduino, however, being a microcontroller, is designed to do only one thing at a time, and does it repetitively until instructed otherwise.
The Magic Is In the Code
The Arduino is programmed in a Python-esque language that
hides the C++ that lies below. Have I
scared you off yet? Don’t be. It’s actually very easy to pick up. I’ve done a fair amount of coding but it’s
mostly been web and data applications, where most of the low-level stuff (like
writing to the screen) was done for you, which leaves you to focus on the
logic. This is actually very similar. There is an Integrated Development Environment
(IDE) for the controller which runs on your PC and is where you create, compile
and load the code that the controller executes.
You plug the controller into your PC with a USB cable, and the USB
supplies power to the controller. There are lots of libraries available that do
most of the heavy lifting (the internet is your friend for all kinds of
examples), and you are left to stitch them all together in a “sketch” to do
what you want.
Our class started by assembling the hardware (again, easy)
and then loading a very basic routine that setup the controller’s Wi-Fi and
then went to the internet for the time (using the NTP pools) then just wrote
that to the display. This approach
leaves a lot to be desired, and several people in the class noted the problems
almost immediately: Too much load on the
NTP servers. No connection, no
time. No provision for daylight saving
time. Several of us left to immediately
do what we hams do – tinker, poke around, and see what we can improve! I found a better time library that was a much
better fit for what we were trying to build, and after a couple of different
late night software iterations, the group now has a clock that sets the time
once, calculates local time for your time zone, corrects for daylight saving
time, and synchronizes once per day to the internet to keep your time accurate
– all for the cost of a decent lunch.
And in the process, I learned a bunch about microcontrollers, how to
code them, and how to hook things up to them.
I now have a small but growing list of things that I would like to play
around with, and requests are coming in on additional things that could be
added to the clock project (like a battery-backed real-time clock circuit that
would maintain time even if powered off or not connected to the internet – I’ve
already got the $1.50 part on order from China…). Brady is already looking for other fun things
to do in conjunction with RWK and/or the Dallas Makerspace where he teaches.
If all you want is a clock, then go buy a clock. But if you want to learn and have a bit of fun and end up with a pretty cool “look, I made that” clock, then this might be the project for you too!
Finished Ham Clock in its cool 3D-printed Case
(this article was written for the Feb 2020 issue of the Richardson Wireless Klub newsletter, The Chawed Rag)
I discovered Ham Radio early in 1977 when I was a freshman in High School. I had bugged my Dad for a CB Radio during the CB/trucker craze in 1976 (anyone remember Convoy?), but the actual product (a Midland portable) left a lot to be desired. Mostly squeals and squawks and very little of interest from a boy’s bedroom. So my Dad signed us up for a Novice class, put on by the local radio club, and we learned CW, regs, and a little radio theory. Being young, I picked up the code faster than he did, but ultimately we were both licensed as novices, me as WD4EJO.
I was very fortunate that my Dad had a background in electronics and had the means to get us a new radio – a Kenwood TS-520S (I loved that radio!). Over the next few years, we ended up with a great station and a modest tower with a 3 element triband beam (a used Mosley TA-33 that was shipped from New York). It was a bitch to assemble and put up, but I worked the world on that antenna. Within 2 years, I had upgraded to General, then Advanced, then to Amateur Extra (with 20WPM code test!) by 1979.
As far as ham activities, I’d done more than most at that age. I was involved in my local club ((RACK – W4BBB – the same club that offered the license classes) and served as club secretary, newsletter editor, and on the hamfest committee. I got to operate a bunch, earn my Worked All States (in the Extra class portion of 75 meters! – the Geratol Net WAS #348), work a lot of DX during the great Cycle 21 peak, build a lot of neat things, work field days and fox hunts, and me and a fellow ham friend even modified an old Western Union FAX machine to send radiograms over HF. I did a lot of club radio-related activities, including helping to build a 2M repeater in the foothills of the Smoky Mountains – nice view at the top of that tower (elev. 2,970 ft.)! I also experimented a lot, built a lot of things, and generally did what hams do – learn and have fun with radios and electronics.
I also got involved with computers in high school (this was 1977) and bought a Radio Shack TRS-80. I had a lot of fun with the computer and programming as well, and even then was looking for a way to combine radios and computers – it’s a lot easier now, but then it was very clunky. I got to experiment with lots of what was then cutting edge and the predecessor to today’s personal computer. It seemed inevitable that I went to college and majored in Electrical Engineering, something that would allow me to combine my love of radio and computers.
After college, I moved to Texas to work in the defense industry. Ironically, although my day job involved lots of radio and computer-related technology, I didn’t get to do much in the way of ham radio. I was busy, traveled a bunch for work, and lived in an apartment that limited my antenna farm severely. I spent several years not making a single contact and never really got involved in the local clubs. But the itch was still there, just under the surface. I bought a radio and would tune and listen, but fear of interference of the neighbor’s stereo and telephones kept me off the air.
Fast forward to recent times. I’ve traded an inner-city condo for a suburban house. One day I was driving down a main thoroughfare close to my house and saw a sign that was advertising ham radio exams by the local club. I had forgotten that Richardson (home of Collins Radio) had a great radio club, and now I was seeing the evidence. I went home and looked up the club and went to the next meeting. As hams do most everywhere, the members welcomed me with open arms, and I’ve gotten involved in lots of club activities. I also unpacked most all of my ham gear, got an antenna on the roof, and got a station back on the air. I discovered this new FT-8 mode that makes the most of the crappy sunspot cycle that we are in, and have had fun working bunches of local and DX stations on the newest mode. I’m also back to building stuff, even if it’s nothing more than interfaces between radios and Raspberry Pi computers. Old habits are hard to break.