HamClock – A Shack’s Best Friend

By Chip Coker KD4C

What if I told you that there was once a big wall-mounted device (called a GeoChron) that cost hundreds, even thousands, of dollars, and that many hams coveted it as the ultimate shack accessory. And what if I told you that said GeoChron gave you an up-to-date DX map of the world and showed light/dark areas, sun position, and grey line, and was the first thing a non-ham noticed when walking into a ham’s shack for the first time, getting “oohs and aahs”. Now, what if I told you that, instead of having to buy a big expensive gadget, all that capability and much much more is now available in a single piece of software, and that software is FREE and runs on a Raspberry Pi. So now for $15 (Raspberry Pi Zero) and a bring-your-own HDTV or computer monitor, you can have the ultimate shack accessory!

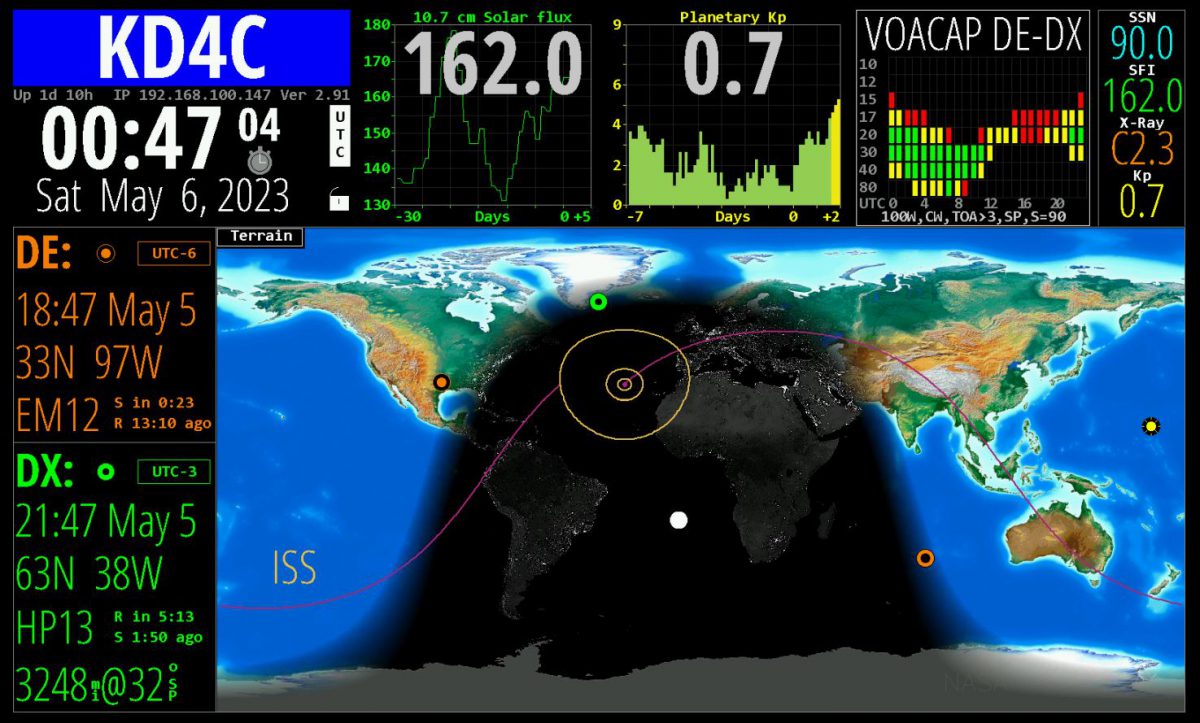
This software is packed with so many helpful features that I’m going to have a hard time describing them all here. First, in addition to a Local or UTC clock, it’s a real-time Map of the World, that shows sunlight position and illumination, and the current position of the “grey line”. Second, it displays information about your selected “DX” station, including position, grid square, short path and long path range and rotor bearing, current weather, and time. Third, it has helpful “widgets” for propagation (SFI, Sunspots, Planetary K, DRAP, Sun imaging – pretty much any propagation related statistic. Fourth, it can monitor and display live spots from the DX cluster and POTA and your spots from PSK Reporter. Fifth, it has built-in orbital predictions to show when your favorite ham satellites are going to be overhead. Plus, you can view and control the entire display in a web browser on your network (if you have the big image on a wall HDTV). Oh and did I mention that the software has a full API so you can control it from other software (more on this later)? Now I’m exhausted from trying to describe the features, and I’m sure I missed some.

A recent HamClock image from my shack. Just look at all the features crammed into this little (and free) marvel!

Now surely by now you’re asking “how can I get such a thing?” Well, the hardest part is getting your hands on a Raspberry Pi. A Raspberry Pi Zero will work just fine, and they have been available every other week at MicroCenter – You will have to be diligent and check the website. You will also need a MicroSD card (also available at MicroCenter). The process is fairly simple, even if you’ve never done much with a Raspberry Pi: 1) Install Raspberry Pi OS (there are a bunch of YouTubes on how to do this), and 2) go to the HamClock page, select the “Desktop” tab, and follow the easy instructions. The User Guide is fully documented so you can figure out all the things that you can configure and click on!

Because this is Linux, I will warn you now that it’s not the usual Microsoft “double click the installer” app – there are some “command line” instructions (I think a total of 4). Do not let this scare you off! The result is worth it to have this on your shack wall. I recommend that you just run it “full screen” and just use the built-in HDMI out of the Pi (you might need an adapter) and just pump the display into a wall-mounted HDTV or a spare computer monitor with an HDMI input. But you can also just stick the Pi under the desk and run it in a browser window, through a VNC session, or on a small dedicated display.

Oh, and I mentioned a fully scriptable interface. After a small mention and prompting from me, Josh N4NZ created a small NodeRed flow to take the “double-click” station from WSJT-X, harvest the Grid Square, and send it to HamClock. So now when you click on a station calling CQ on FT-8, the HamClock map will then set the DX on the display and you will see the path, range and bearing, etc. That’s both cool and helpful. This part is a little more involved than the basic install, but if you understood the previous sentences in this paragraph, talk to one of us after you get HamClock up and running!Jason KM4ACK shows how to install and configure HamClock (as well as some extra things list change the display resolution)

Add Weather to Your Ham Clock

In my copious free time, I’ve been working on what to do with my empty Line 2 from clock ver 4.2.  I went looking for online weather information that I could scrape and display, and there are a few different sources.  I picked one (the price was right) but they are all fairly similar so this should be adaptable to the others if you want to play around.

Here’s what my display looks like now:

Clock with Weather

As with V4.2, the time updates once per day with the online NTP pool.  The weather info is refreshed and displayed every 10 minutes (user changeable, but the free service is limited in the number of inquiries per day.

Here’s what you have to do to sign up for the free weather info:

  1. Go to https://openweathermap.org/api  and click “Please sign up”.  You’ll have to enter and verify your email.
  2. After that, it should display your personal API key (a 32 character string) – save this key, you will need it.
  3. Once you open up the V4.3 code (attached), there will be a place in the customization header to paste the key.
  4. Don’t give out your API key – if your key exceeds the free lookup limit, they will shut off your access.

There’s one other library that is needed in 4.3 to parse the JSON data from the weather API:

  1. Inside the IDE, select “Tools -> Manage Libraries”
  2. In the search box, type “ArduinoJson” ** Make sure you select the Highest Version 5 (5.13.5) in the pick list, then Install.  If you mistakenly select Version 6.X.X, your sketch won’t compile!)
Arduino JSON Lib Install

There’s a customization for weather location as well.  It’s set to Richardson, but if you want to change it, openweathermap.org has a download of thousands of city ID codes that you can substitute in (I’ve put the code for plano in a comment line for those of you up north).  If you don’t want to download the list, ask me and I’ll find your city code if it’s available.

If you look at the raw JSON data, there’s lots of other information that could be extracted and displayed if you want to rearrange the display and dive into the JSON parsing logic.  There’s also a separate forecast string available.

Raw:{"coord":{"lon":-96.73,"lat":32.95},"weather":[{"id":804,"main":"Clouds","description":"overcast clouds","icon":"04d"}],"base":"stations","main":{"temp":44.89,"feels_like":41.02,"temp_min":42.8,"temp_max":46.99,"pressure":1018,"humidity":87},"visibility":16093,"wind":{"speed":3.36,"deg":40},"clouds":{"all":90},"dt":1580421184,"sys":{"type":1,"id":4066,"country":"US","sunrise":1580390620,"sunset":1580428588},"timezone":-21600,"id":4722625,"name":"Richardson","cod":200}

Other than the weather inclusion, I’ve done some work for power management.  This version shuts off the WiFi connection when not in use and adds a couple of other delay tweaks and uses about 65% of the current of Version 4.2.  Mine draws around 80mA now.  There may be some more tweaks to the backlight to cut the draw down further in the future.

That’s it for now, until I get my RTC chip in from China and can play with keeping the clock going through power outages.

Give it a try and let me know if you have questions.

Build Your Own Ham Clock

(or How I learned to love Arduino projects)

Recently, several of us in the Richardson Wireless Klub completed a small project session led by Brady Pamplin W5LH and Mike Jahrig KG5P to create a very inexpensive Wi-Fi-connected clock based on easy-to-use (and to learn) Arduino microcontroller and a multiline LCD display (see Figure 1).  For someone that has had no experience with these types of components, I was intrigued and wanted to learn what these types of components are good for and how easy or hard it would be.  I was very pleasantly surprised!

Arduino Ham Clock
Arduino-based Wi-Fi-connected Ham Clock Project

What’s an Arduino?

The Arduino is a small single-board microcontroller (processor and basic interfaces).  There are several versions but all are easy to use and have become very popular with hobbyists and in educational uses. The project started in Italy (“Arduino” was the name of the bar where the team met) to create low-cost and easy-to-use devices that can easily interact with the environment using sensors and actuators.  A very large number of types of devices are now available and are being used in a huge number of very creative ways.  You can find several types of devices in the hobbyist section at places like MicroCenter, but your best bet is obtaining parts on eBay directly from China, where they are much cheaper but take awhile to arrive.

The basic parts that we used for the clock were a WeMos D1 Mini (around $3.50) and a 4 row x 20 character LCD display (around $7).  Brady even whipped up some 3D printed cases.  The microcontroller is powered by a micro-USB port (think phone charger) and in addition to the built-in input/output interfaces, has built-in Wi-Fi, so it’s very easy to build things without having to figure out the basics.

For our clock, the hook-up is literally 4 wires between the two components: Power (5VDC) from the controller board to the LCD display, and a serial interface (data/clock) to the display’s interface module.  Even if you didn’t want to dive into how all this works, you could easily build one.  But you would be missing most of the fun.

It’s important to note the difference between the Arduino and a Raspberry Pi.  Although easy to confuse, they are actually quite different.  The Pi is a very small computer – it has an operating system, common human interfaces like a keyboard and display, and it can do lots of things at the same time.  The Arduino, however, being a microcontroller, is designed to do only one thing at a time, and does it repetitively until instructed otherwise.

The Magic Is In the Code

The Arduino is programmed in a Python-esque language that hides the C++ that lies below.  Have I scared you off yet?  Don’t be.  It’s actually very easy to pick up.  I’ve done a fair amount of coding but it’s mostly been web and data applications, where most of the low-level stuff (like writing to the screen) was done for you, which leaves you to focus on the logic.  This is actually very similar.  There is an Integrated Development Environment (IDE) for the controller which runs on your PC and is where you create, compile and load the code that the controller executes.  You plug the controller into your PC with a USB cable, and the USB supplies power to the controller. There are lots of libraries available that do most of the heavy lifting (the internet is your friend for all kinds of examples), and you are left to stitch them all together in a “sketch” to do what you want.

Our class started by assembling the hardware (again, easy) and then loading a very basic routine that setup the controller’s Wi-Fi and then went to the internet for the time (using the NTP pools) then just wrote that to the display.  This approach leaves a lot to be desired, and several people in the class noted the problems almost immediately:  Too much load on the NTP servers.  No connection, no time.  No provision for daylight saving time.  Several of us left to immediately do what we hams do – tinker, poke around, and see what we can improve!  I found a better time library that was a much better fit for what we were trying to build, and after a couple of different late night software iterations, the group now has a clock that sets the time once, calculates local time for your time zone, corrects for daylight saving time, and synchronizes once per day to the internet to keep your time accurate – all for the cost of a decent lunch.  And in the process, I learned a bunch about microcontrollers, how to code them, and how to hook things up to them.  I now have a small but growing list of things that I would like to play around with, and requests are coming in on additional things that could be added to the clock project (like a battery-backed real-time clock circuit that would maintain time even if powered off or not connected to the internet – I’ve already got the $1.50 part on order from China…).  Brady is already looking for other fun things to do in conjunction with RWK and/or the Dallas Makerspace where he teaches.

If all you want is a clock, then go buy a clock. But if you want to learn and have a bit of fun and end up with a pretty cool “look, I made that” clock, then this might be the project for you too!

Finished Ham Clock
Finished Ham Clock in its cool 3D-printed Case
(this article was written for the Feb 2020 issue of the Richardson Wireless Klub newsletter, The Chawed Rag)